Racal-Dana 199x DIY High Stability DIY Timebase Hack for under $25

Racal-Dana 199x DIY High Stability DIY Timebase Hack for under $25

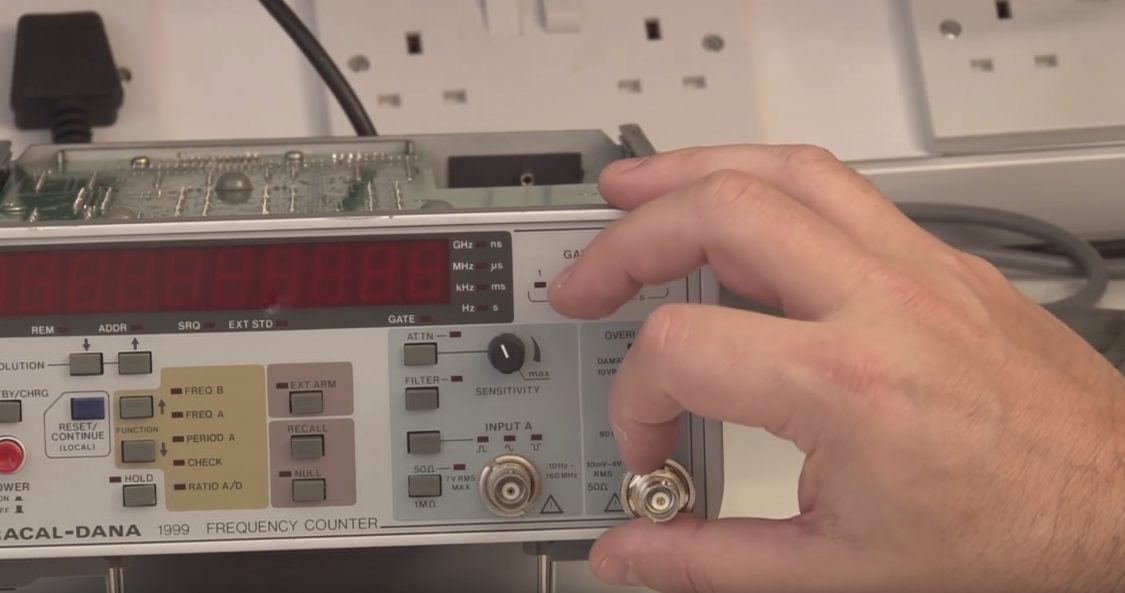
Having played with a number of OCXO’s and a Rubidium standard I tried (after repairing it) to calibrate the standard timebase in my Racal-Dana 1999 counter which is actually a simple TCXO. I could get pretty close but it was touchy and not easy to be totally precise. In response to that vlog article a number of people suggested it would be nice to do an OCXO modification to the Racal counter so I decided to do exactly that, and I done it on a budget too…

One of the problems with this counter is the lack of any 12v supply that is able to provide enough current to drive the OCXO’s oven, so I had a look around and found an OCXO made by Isotemp model OCXO131-100 that runs on 5V which is perfect for this build because the counter has a good 5v supply that can easily drive the additional current required – I have provided a download link for the data sheet for the OCXO I used below below. I ordered one from a seller on e-bay and used that as the basis for the hack.

The other key component needed to implement a stable OCXO board for this counter is a “temperature stable” variable voltage between about 1 and 4 volts, this is used to fine tune the OCXO to allow the oscillator to be calibrated. To get me a suitable reference voltage I have used a MAX6198A, chosen simply because I had some to hand – but also because they have pretty darn good temperature stability too.

Schematic

Here is the schematic I used to create the OCXO board.
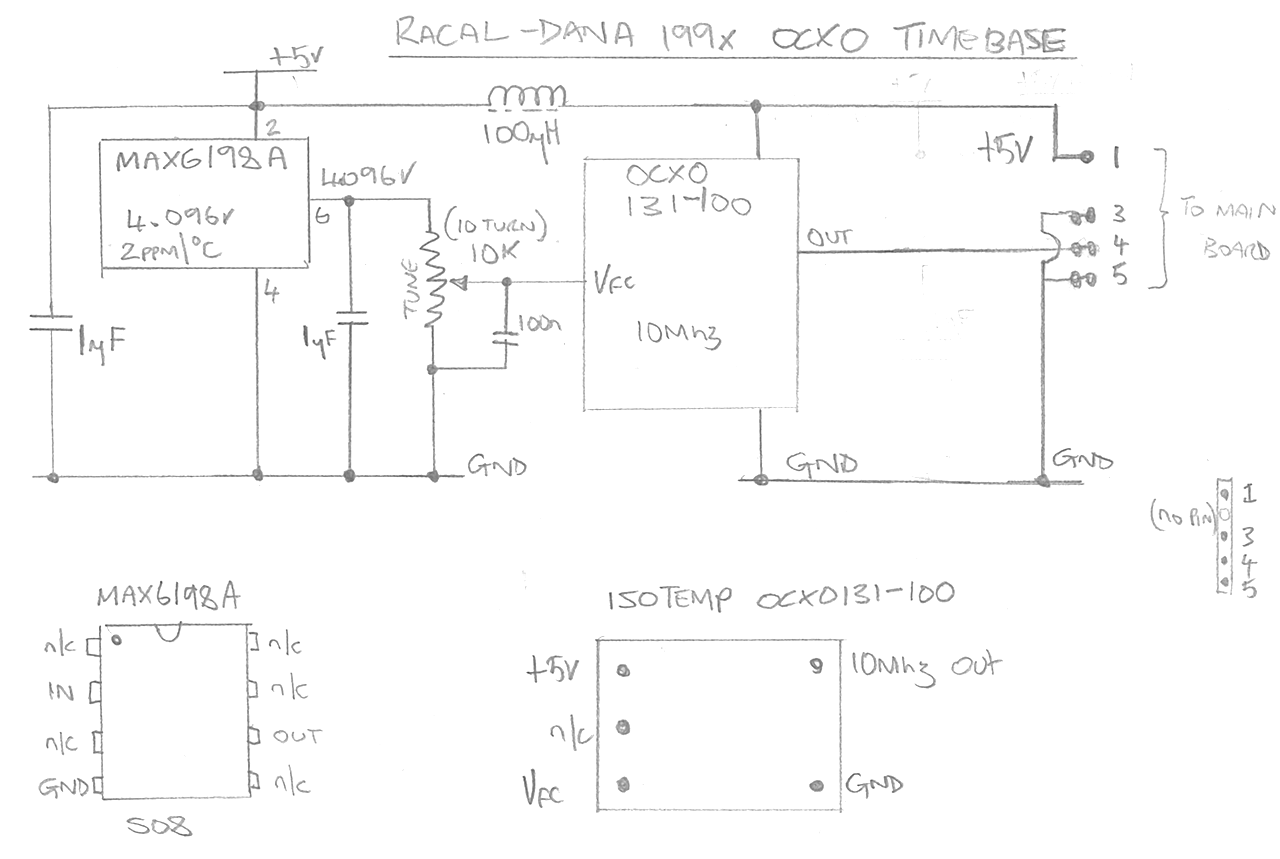
Racal-Dana-OCXO-Mod

Other Information

* The SMD Adaptors I used can be got from here: SMD Adapters – Set #1/

Keithley 2110 DMM Teardown

Following on from my review of the Keithley 2110, I tamper with the tamper-proof seal and open up the meter to see what was inside. While I am there I have a look at the build quality and the overall system architecture. Keithley have a long history of building quality test equipment and I thought it would be nice to see how the latest kit from Keithley stacks up to their past reputation.

The meter is easy to get apart and is built really well, nice solid construction and really very difficult to fault – apart from the really poor LCD display. Please see the video for the details as they unfold.

System Level Block Diagram

Keithley 2110 Block Diagram

Catch you next time…

Keithley 2110 DMM Review – oh and puppies!

A couple of months ago I joined the element14 community and decided to sign up for a Road Test which I did, for a Keithley 2110 DMM, I was not really expecting to be selected but I was which was great – so thank you element14 for the meter and the opportunity to do this review. Now while I am not planning to turn my blog into a review site, I figure that the odd review on new kit might be nice, especially if there is the opportunity to tear it down after the review – in fact I will not do any review that does not involve tearing down the kit to have a look inside.

I have specifically made this a video review so I wont write too much about the review here, you can watch the video for the detail (and the puppies too).

In summary though, I hated the display on first site and that made me want to dislike the meter too. But apart from the display, everything else about the meter, its performance, its build quality and apparent accuracy (so far as I can tell) is absolutely first class. If I had a wish list – or more to the point, if I were in charge of sales at Keithley this is what I would have done differently…

  • Design in a decent display, anything other than what is in there – a nice VFD, or an OLED perhaps, or even a nicer LCD if you have to
  • Ship a thermocouple
  • Make the continuity beeper useful – its way too slow response-wise
  • Write the software so it can be used on Windows, Linux and OSX – it really is not that hard to do
  • Did I say a better display?

Lui Gough also reviewed the meter and has done a really nice write-up for his review, he also tested the software and data collection aspects of the meter, you can see his review right here: Lui Gough Keithley 2110 Review

Other Links

Coming up next, a teardown of the Keithley 2110….

PSION II Teardown – Retro Tech for those Yuppies of the 80’s

The PSION II was the worlds first PDA (Personal Digital Assistant) and was revolutionary in its time. In reality it was next to useless for most things but if you persisted you could store your contacts in it at a push. In this video I take it apart to have a look inside at that 80’s 8-bit computing excellence, break it and repair it along the way.

The architecture is basically a simple 8-bit computer based on a Hitachi HD6301 CPU (now obsolete of course) which was a CMOS version of the now legendary 6800 microprocessor. The CPU running at just under 1MHz along with a couple of EPROMS and some SRAM make up the entire system, very simplistic by todays standards. The portability was made possible because of both the CMOS technology as well as surface mount components which were are relatively new innovation at the time.

The system used Data Packs which at the time were quite expensive. A Data Pack is essentially an EPROM while a RAM pack is a battery backed SRAM chip. These packs are in small cartridges and the PSION II could have two cartridges loaded at any one time. When the Data Pack got full you had to remove the small board from the cartridge and expose the internal EPROM’s window to UV light – not sure how PSION got away with marketing this but I suppose at the time thats all that could be achieved for permanent storage in such a small package.

This is a very hackable device but when all said and done – what would you use it for. The one thing it could be converted to is a portable EPROM programmer, that would not take much effort but EPROMS are not really much use now days. So with nostalgia set aside I cannot think of any sensible use for this (except donating to a computing museum perhaps) so its going into the garage on the “Of no earthly use but too nice to throw away/scrap”!

I found some useful links on the web which describe the technical and user details of these machines which I have provided below.

Racal-Dana 1999 Teardown, Repair and Calibration

I have been using this Racal-Dana 1999 counter for a long time and in the last few months it started to suffer from an intermittent fault where it would appear to freeze and stop responding. Banging the unit on the side with the palm of my hand would get it going again, and when doing this it would often restart as if its been powered on. In addition to this fault, the counter suffers from an altogether common problem with the buttons on the front which loose any tactile feel to them and become difficult to actuate – this is a common problem on these counters and thats down to the poorly designed switches Racal used for its frequency counter range.

I identify the fault and fix the problem and I replace all the buttons with ones that work and end up with a fully restored frequency counter once again.

I have made the manual including schematics available in the attachments section of this article for your convenience

See you next time….