My 2010 27″ 1TB iMac ran out of disk space because of the video content I was creating. Despite Apple’s best effort to limit my upgrade options I manage to upgrade it to include a 250GB Solid Sate Drive (SSD) plus a 2TB Hard Disk Drive (HDD) and get my system back to its last working state but with lots more disk space and much faster boot and application load times. Plenty of gotcha’s along the way – I had to work out and do a few ad-hoc adaptations. I cover new disk preparation, computer tear down, SATA adaptation, HDD temperature sensor hack and data moving, and data and account recovery.
This is the longest video and the longest blog article I have written to date, and thats reflective of how much there is to cover – is not a simple task.
I removed a Seagate Barracuda 7200 1TB drive which is still in working condition, despite being one of the drives on a recall by Apple. They offered to replace the drive some time back but I refused as it was inconvenient to be without my computer for a week, let alone the hassle of taking it to and collecting it from an apple store.
I installed the following components.
- Samsung SSD 840 Series 250GB
- Western Digital Green 2TB – 6 Gb/s 64Mb Cache
- SATA 90 degree Cable
- SATA Power Splitter
The 2TB drive was a perfect physical fit but did not have a compatible on board temperature sensor so I had to fashion one from a transistor, I used a TO-92 2N2907 and used the base-emiter junction as a silicone temperature sensor. The SSD drive had to be installed with double-sided tape but being so small and light this was the best solution. The whole modification to the computer is 100% reversible.
WARNING: This is an EPIC video at 1hr 20mins so only watch if you are really interested and have some time on your hands 🙂
The following outlines the various commands and steps I took to make this work. I am not saying this is either the only way or the right way, its the way I used and it worked for me. The most important thing I wanted to achieve was to preserve all of my data and never have a single point of failure for my data throughout the entire procedure.
Before we do anything we must ensure that…
- The computer is in a working state.
- Have a *FULL* backup of the system – in my case this was on an Apple Time Capsule
- Ensure the current system has *all* software and OS updates applied.
- Ensure that you are logged in and have administrative rights on the account you normally use
Tools Used
- Intergral Hard Disk Copy Station
- T8 and T10 Torx Drivers
- Stanley Knife
- FindSpace Utiltiy Application
Prepare SSD Drive
- Using the drive copy station, connect the SSD drive to the computer via USB
- Choose “Ignore” when you are prompted to initialise the disk you just connected.
- Using the Applications/Utilities/Disk Utility create a single partition on the drive – use all default options, call the volume “OS Boot” or other name you will recognise or makes sense to you
- Run the OSX Mountain Lion Installer application
- When shown the drive to install on, press the Show All Disks button and select the drive you just created a partition on
- During the install follow all instructions as if you are doing a new OS install, once complete it will want to re-boot, let it do what it wants. Eventually it will boot to your new drive
- During the installation it will want you to create the administration account, call this “Admin” or something else you do not already have on your current system.
- Don’t worry, your existing drive will still be intact. Once you have booted from the SSD drive and verified its OK, shut down the computer unplug the SSD and re-start, it will boot to the original drive once again.
Prepare New HDD Drive
- Connect the new drive to the USB using the drive copy station
- Choose “Ignore” when you are prompted to initialise the disk you just connected
- Using the Applications/Utilities/Disk Utility create a single partition on the drive – use all default options, call the volume “Users”
- You should now see your new 2TB disk in finder, the disk should be empty.
Now we need to create a temporary account to unlock your profile so we can copy your home folder to the new drive.
Create a temporary Admin Account
- Open System Preferences/Users & Groups
- Unlock the panel if required
- Add a new user, in the New Account field select Administrator
- Log out of the system, and log back in using this new account you have created
At this point you are ready to make a copy of your user profile(s) from your existing 1TB disk to your new 2TB disk. Open a new terminal window (Applications/Utilities/Terminal). You can list the accounts on your system by issuing the following command: –
ls -li /Users
For each account on your system that you want to re-locate to the new 2TB drive you should issue the following command: –
sudo ditto -v /Users/<ccount_name> /Volumes/Users/<account_name>
You should obviously replace the <account_name> part with the account name. In my case the command was: –
sudo ditto -v /Users/gerrysweeney /Volumes/Users/gerrysweeney
NOTE: You do NOT want to make a copy of the temporary admin account you created earlier that you are currently logged in as…
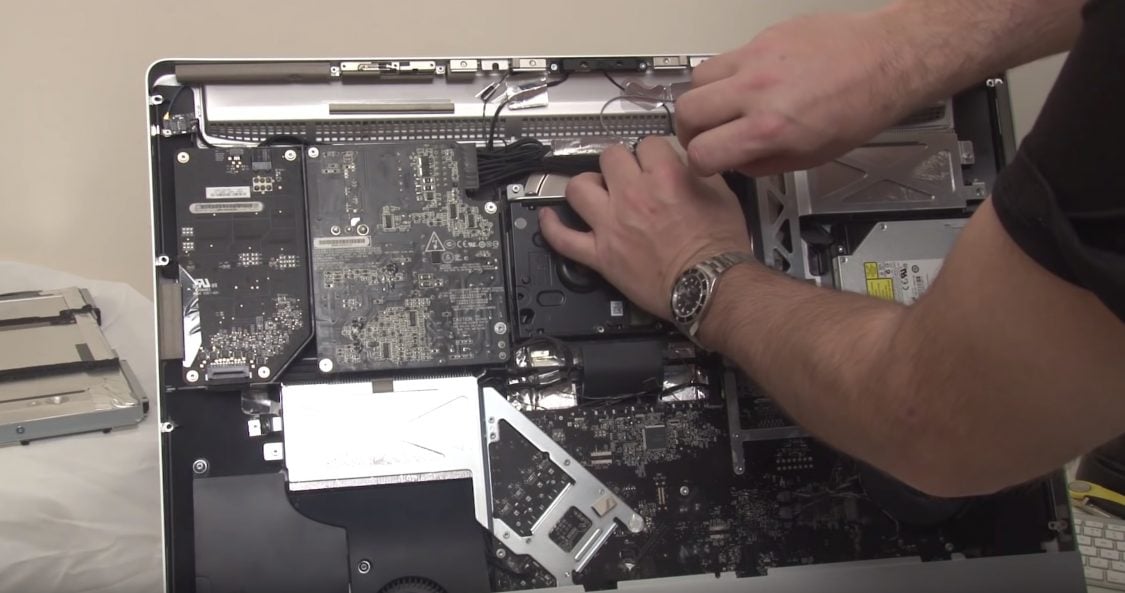
Do the hardware hacking
At this point you are ready to start the disk transplant process. You want to do the following things in order.
- Shutdown the computer cleanly
- Unplug all cables
- Take the computer apart and remove the 1TB hard disk
- Transfer the mounting braket and studs from the 1TB drive to the new 2TB drive
- Put the old 1TB drive into an anti-static back and put in a safe place – this is your fast recovery/back-out plan
- Remove the optical drive, screen backlight supply and main power supply boards, and then the main board – see video
- Install the new SATA cable for the SSD drive – either use the third SATA port or remove optical drive SATA cable and use that port – depends on your iMac model
- Replace the main board and PSU baords, take a lot of care routing the new and existing cables, there is very little room for error here
- Install the SSD drive using double-sided sticky pads – make sure its well fixed, you do not want it coming loose as it will interfere withe air flow that cools the GPU – this will Kill your iMac!!
- Re-install the optical drive (with or without being connected), the drive carrier acts as part of the air ducting…
- Install the new 2TB drive
- Fashion a suitable temperature sensor for the new HDD, I simply used a 2N2907 transistor which works a treat from what I can tell
- Re-assemble the computer
- Power up and make sure it boots to the new SSD drive
- Log into the “admin” account you created – this should be the only account on the system
If all has gone well you should have a fresh new OS and you should be logged in as administrator. The next thing we need to do is re-create the accounts and then re-locate their home directory.
Follow these next steps carefully…
First of all you need to create a new account for each account you have re-located. In my case the account I relocated is “gerrysweeney”. So go into the System Preferences/Users & Groups tool, unlock it if needed, then create the new account. By default, this will create a new account home folder on the SSD, thats OK, we will need to deal with that next. If you have more than one account you have re-located, create a new corresponding account for each one. When you create the account, use the same password as your previous account, this way your keychain will remain accessible and valid once you re-instate your home folder.
Now you have a new account with a new home folder on the SSD drive, the next thing is to modify that account and point it to the home folder you previously re-located. In my case the account was “gerrysweeney”. In the Users and Groups tool, press the “Ctrl” key and click on the account name, you should get a menu option called “Advanced Options…”, select this. The “Home Directory” field will be set to “/Users/gerrysweeney”, you should change this to “/Volumes/Users/gerrysweeney”. Again, do this for each account you have re-located.
UPDATE: Having done this I realised that later on I still have to set up a symbolic link to the home folder which is a couple of steps below. In lights of that you can simply skip the above step of modifying the account properties to re-locate the home directory. Once the symbolic link is in place it will work without doing this.
Now we need to change the permissions of each account’s home folder data to the account – this is important to re-syncronise all permissions. Open a terminal window and for each account you have re-located you should issue the following command: –
sudo chown -R gerrysweeney:staff /Volumes/Users/gerrysweeney
This command will change the ownership of every file in this folder, including the folder its self and all sub-folders and files. Now I am not sure this is exactly right, it is feasible there are system files that should be protected from the user but I don’t know – what I done worked OK so its pretty safe. In any case you need to do this for every account you have moved – remember to replace “gerrysweeney” with the right account name.
Now you have given the right ownership to your files, we now have to deal with the fact that much of your existing configuration will be looking for profile and other content from /Users/gerrysweeney, and the way we deal with that is by creating a symbolic link. In the terminal window you should issue the following command to delete the newly created home folder on the SSD drive that we no longer need.
sudo rm -rf /Users/gerrysweeney
Now you should create a symbolic link to map the expected home folder location to the relocated folder on the new 2TB drive. To do this you should issue the following command:
sudo ln -s /Volumes/Users/gerrysweeney /Users/gerrysweeney
You should do this for each account you have relocated. You can double check this operation worked by issuing the following command:
ls -li /Users
which should show you something like this...
total 8
 135869 drwxrwxrwt  13 root   wheel  442 13 Oct 20:22 Shared
 329606 drwxr-xr-x+ 13 admin  staff  442 14 Oct 10:18 admin
1056113 lrwxr-xr-x   1 root   admin   27 14 Oct 10:17 gerrysweeney -> /Volumes/Users/gerrysweeney
You can see that gerrysweeney is pointing to /Volumes/Users/gerrysweeney
The next thing we need to do is recover your applications. You have the option of simply re-installing them all but thats a right royal pain, I found this worked really well and mostly re-instated everything for me.
Get your original 1TB disk and using the Disk Copy Station connect to the computer via USB, you should be able to see this drive in finder. Make a note of the volume name for the drive – in my case this was “Macintosh HD”. In order to recover the applications, you basically need to copy all of your Library and Application Files to the SSD. To do this issue the following commands: –
  ditto -v /Volumes/Macintosh HD/Library /Library

  ditto -v /Volumes.Macintosh HD/Applications /Applications

  ditto -v /Volumes.Macintosh HD/Developer /Developer
Now with all that done, you should eject the original 1TB HDD using Finder and you should shutdown and re-start the computer. While re-booting you can unplug the Disk Copy Station, you should not need it any more.
At this point you should be able to log in using your original account – in my case this was “gerrysweeney”. If everything worked out OK then you will now have a working system, your desktop, applications and settings should all be restored and in the same state as they were before you started.
Set aside a day to do this, its a pain, there is a lot of fiddling around and there is a lot of waiting for stuff to copy. In the end though its a worthwhile mod that Apple does not want you to do.
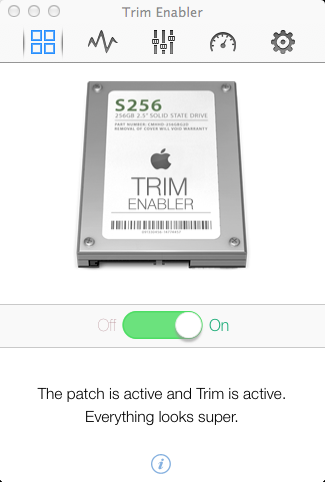
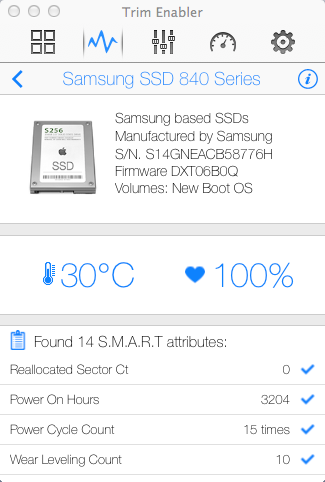
Enable TRIM
UPDATE: I had found this after I finished the article and Anton pointed out in the comments I should include this information because it is important. Thank you Anton.
In order to maintain the healthy state of your SSD and prolong its life you need to enable the S.M.A.R.T features and make the OS and the SSD Drive communicate using the TRIM commands. This basically allows the OS and the SSD drive to play nice and help prolong the life of the SSD by minimising erase cycles, the OS simply informs the drives that blocks are no longer in use. Doing this is easy, you can simply install a piece of software called Trim Enabler which takes care of this for you. If you want to know more about TRIM you can read this wikipedia article
IMPORTANT DISCLAIMER
DO THIS AT YOUR OWN RISK. I HAVE PROVIDED THIS ARTICLE IN THE HOPE THAT IT WILL BE USEFUL FOR OTHERS. HOWEVER, YOU SHOULD KNOW THAT OPENING YOUR COMPUTER INVALIDATES ANY WARRANTY YOU MAY HAVE AND WHILE THIS APPROACHED WORKED FOR ME, IT MIGHT NOT WORK FOR YOU AND IF IT ALL GOES WRONG FOR YOU I CAN NOT BE HELD RESPONSIBLE. THERE ARE LOTS OF DELICATE AND SENSITIVE ELECTRONICS THAT ARE EASILY DAMAGED IF YOU DO NOT HAVE EXPERIENCE HANDLING THEM – PLEASE ONLY DO THIS IF YOU ARE CONFIDENT IN YOUR OWN ABILITIES
This content is published under the Attribution-Noncommercial-Share Alike 3.0 Unported license.
Hi Gary, thank you for sharing, I enjoyed hearing the way your mind works. I have a question. I am going to fit a USB3 card and an SSD but my 2010 iMac runs hot; your SSD placement doesn’t decrease air flow/raise temp? I would like to fit better fans, if they exist. The 1TB Seagate HD makes my iMac bass-rumble/loud; rev SP25 of that HD is/was recalled, as you say, but I don’t want a hurried tech putting dings in the aluminium, which happens a lot when I send things off to be serviced. I bought a 2TB Seagate HD to stay compatible with the Seagate heat sensor cable (otherwise the iMac’s fans are permanently on full). I want to dampen HD vibrations to silence HD, might make a cats cradle of silicone strings to replace screws, beef up the thin-ish looking aluminium HD bar. Any thoughts about any of that? Thanks. 🙂
Hi, the SSD runs cool and is very thin. There is still significant airway for the GPU and I have not noticed any increase in GPU running temp. The new drive and the 292907 temp sensor both work perfectly, the fans are NOT running and full speed and when working hard the HDD temp and the fan speed increase proportionately so all in all I am very happy that the mod works well. It would be hard to improve the Apple fitted fans IMHO..Gerry
Thanks for getting back to me, good to hear that! The original off putter, for a while, was that Apple appeared to have firmware flashed the Seagate hard drives and then doubled down by fitting a proprietary cable with each brand of HD – mainly Hitachi, WD, Seagate – that they fitted to that model, that would only work in conjunction with that particular brand of Apple firmware flashed HD. I was frustrated because I wanted to fit a quiet Samsung spinpoint drive. I was back and forth with OWC in the US about this and the possibility of my fitting USB 3 for a while. They hadn’t at that time heard about the fans running at full speed with user upgraded hard drives and the wrong/no temp cable, but the forums were full of it. Some resolved it with software, some shelled out a lot for an Apple spare HD temp cable, other’s purchased a 2009 iMac cable which tapes/glues to the HD, some shorted the cable, a few did as you have cleverly done. I think Apple fit the SSD under the… the area you pointed out that has heat pipes behind it, the gap in there. As my model runs on the hot side even when not under heavy load, I am concerned about air flow. I need to experiment, get my hands dirty. I am still trying to choose between USB3 cards and figuring out where I can put a USB3 socket without marking the case. I suspect you are right about the fans. I tried blasting the back of the iMac with a 140mm fan and it cooled down the case, which I had always assumed acted as a huge heat sink, but made virtually no difference to the recorded internal temps. I hope the 2GB Seagate I went for is cool-running. I need to remove it from its USB3 shell, where I hope to put the SP25 rev 1TB Seagate. It will be interesting to see if the Apple firmware on it gets in the way. Any further upgrade plans? Much enjoyed your video.
Hi Andrew, I am not planning to do anything else to the MAC, I did think about a SATA splitter to re-instate the optical drive but to be honest I don;t really have a need for it so I probably wont bother. I could do with more RAM but I think 16Gb is the limit on this model 🙁 Gerry
I have seen the StarTech SATA power splitter used before, though it’s different to the one OWC, cheap at least (why do Maplin have to be so expensive!) http://www.amazon.co.uk/StarTech-Power-Splitter-Cable-Adapter/dp/B002N2EHVQ/ref=sr_1_1?ie=UTF8&qid=1382734212&sr=8-1&keywords=StarTech.com+SATA+Power+Y+Splitter
A fixit guide linked me to http://guides.crucial.com/Item/6%22_SATA_Power_Cable_Splitter
16GB, I need to upgrade from 4GB! I suppose 12GB is my cheapest path. OWC plugged Apple’s default Samsung as working best with the 2010 model. What did you upgrade with? My iMac story/project was purchased by my estranged dad to put Hi-band/Low-band Umatic tapes onto DVD. I advised Mac Pro, its USB 3 needed for a specific capture card with a timebase corrector. He somehow instead bought a USB2 iMac, lost his temper that it didn’t do what he wanted, didn’t work like a Windows box, had one of the usually bass-noisy Seagate hard drives; gave it to my step mother. She felt guilty that I had spent ages researching video capture Mac Pros/Hacks/capture and semi-seriously suggested I have the iMac. I thought she was joking. The two of them argued with me in the middle. Trauma! I have never received anything from my estranged dad and somehow left with an iMac that I didn’t quite want? I tried to return it to him but no. It sat, unloved and noisy for an age. I’m not determined to turn it into a video editor, with USB3 card, but for my own use! It runs hot; I worry about screen discolouration in later life. I think your choice of a WD Green hard drive was inspired, temps/noise wise. I read somewhere that Apple finally replaced people’s 1TB SP25 rev Seagate with a quiet 2.5″ laptop drive! I don’t know if that is consistently the case but it sounds like a downgrade/less durable? I swear, all the 2010 iMacs in the Apple store/John Lewis sounded quiet. I considered the WD red/NAS 3TB drive, which is very quiet, comparatively. I don’t have the temps specs for it. I think it would be okay (as a non boot drive). I built my own Mac. Owning all the software, I felt this was hobby-legitimate. Still, nothing looks like an iMac, does it!
I like the iMacs, they are tidy and look great, and unlike the dumb windows computers they have a decent *nix OS under the hood which makes doing unix server stuff easy. I think Maplin are expensive so they can pay the rent on the stores – I think they do well to stay in business given the severe competition from on-line retailers. The day I bought the HDD and the cables I probably paid about £40 over the odds in Maplin but at the end of the day I got what I needed there and then so I can’t really grumble.
Gerry
The dig against Maplin – where today I picked up T8 and T10 Torx tools for £2 and a 3TB Seagate USB3 on offer (only £5 more than Amazon, who incidentally delivered my 2TB Seagate yesterday in terrible packaging) – was meant as a gentle dig, that faint resentment you get buying a cable that cost pennies for £6, or a couple of wood screws in a DIY store for what seems a similarly monstrous price. Maplin don’t have the Y-splitter SATA power cable. The Silicon-group store (Edinburgh) across the road from it had one that looked almost identical to the OWC one but it looked to be only 60mm long, at most (the otherwise identical OWC one is 7inches long and I’m assuming OWC went with the untypical 7″ length rather than the common 60mm for a reason). With the OWC cable, at the male SATA end, the wires enter side on, which ordinarily in some circumstances would be great if pressed for space behind the SATA drive, but that male plug in the OWC picture is oddly long, perhaps for easier handling.
http://eshop.macsales.com/item/OWC/CBLSATAPWRY/
I already have a couple of molex-to-female-SATA leads which I can snip the Molex connectors off of, so went back to Maplin and bought this which I will cannibalise the Male SATA part from
http://www.maplin.co.uk/sata-right-angle-power-extension-cable-60cm-99563
to make a 7″ Y splitter. I am particularly attracted to the short length of the male SATA plug (the one I got is different to as-pictured, it lacks the notches/hole mounts, is shorter still but still looks reasonably durable) and, though in some ways I would rather have bought Silicon’s offering, the Maplin branded one felt fractionally little less flimsy. Any thoughts on thermally insensitive foam tape? I was thinking velcro but again I don’t know how the sticky backing would stand up to years of dry heat. Another trip to Maplin, perhaps, this time with blinkers on. I will put whichever Seagate drive is quietest/coolest into the iMac. Fed up of repartitioning my old IDE drives to avoid damaged/dying areas, can only recycle for so long. 3TB seems huge but once I get into video work, I am sure won’t seem the case?!
I know what you mean about paying for something that should be cheaper but I guess e-bay and the whole on-line e-commerce revolution has set pricing expectations to a point that make it difficult for retail stores to compete – I was not otherwise defending Maplin in any way. 3TB does not last long for video, it soon gets used up. Gerry
Apologies, Gerry, I somehow called you Gary. It has been a long day. Apple and I think OWC install the SSD behind the upper right hand side heatsink beside the hard drive which I know you pondered on the wisdom of. I haven’t found literature on how that effects temperatures. If not interfering with air flow to any great degree, your method looks good. Perhaps it wasn’t considered previously because there weren’t slim versions of SSD drives initially. Apple have a fitting kit in their spares catalogue, for the behind the heatsink fitting, which, along with cables/adapters is alarmingly expensive.
The power cable 922-9531 with connectors for logic board, LED backlight, hard disk and SDD which replaces the old power cable. Mounting kit 922-9485 for the SSD which will replace a small plastic part. The SATA data cable 922-9538
Having had problems with SSDs coming detached that I have fitted to other computers with double-sided sticky foam, do you have any personal recommendations for thermally relatively insensitive foam double-sided foam tape? After supper I watched the post install part of your video and see that you have the Apple firmware flashed Seagate HD in a USB caddy/enclosure and, as hoped, it works fine. Good to know. Thanks again for your helpful video.
Hi Gerry,
An update and I notice that our model can, it seems, take 32GB or ram.
My upgrade to an SSD drive (I went with where Apple install there SSDs but used heavy duty velcro which I’m hoping the sticky backing won’t dry out any time soon) went well and replacing the 1TB Seagate hard drive with a 2TB Seagate model, that came in USB enclosure, resulted in a significantly quieter iMac. I dampened the vibrations down a bit with some silicone washers that I made but I’m sure that has little to do with how much quieter it is; the 2TB hard drive just is a much quieter unit than the batch fault 1TB model. I was tempted to fit a USB 3.0 card, which having cajoled and nudged the community over the years, now seems a stable reality where before I was mocked for suggesting it. It means removing the airport card from the mini PCIE and putting a USB card in there. I won’t put a link on the site that shows how to do it, because the particular community isn’t much liked with a lot of users, but it’s an easy Google search. I would want to add an internal USB header, so to speak, for a Wifi card and I haven’t thought that through, yet. Also, I need to make a new memory plate cover with a space for a usb socket or hole for the cable.
I was looking into memory. As far as I can remember, our 2010 model is quite picky about memory and the preferred is the original Samsung memory. I couldn’t find the long thread about memory compatibility but I found someone asking if they could fit 32GB of memory. Everyone was as expected saying no but then someone popped up who had fitted 32GB and had tested it, 8GB in each slot. He had pictures and tested it with a memory tester application. Intrigued, I then looked elsewhere, specifically on OWC’s site to see if they were selling a 32GB kit for the mid 2010 iMac. I just now dissevered that they are, so thought I would pass that on. Hopefully it is stable. The cost is a bit daunting.
I hope to make a still pics blog about my adventures with my noisy hard drive model and will post a link here. Your video was just the nudge I needed to get over my procrastinating! Ultimately, I would like to gut my iMac and fit an mini ITX board with a Haswell CPU but that will need a lot of homework… I think I will just enjoy what I have, for now. Also, I can use the iMac’s screen as a monitor with my existing desktop computer. I just made an oak desk capable of supporting the weight of everything! Have you made any more modifications to your iMac?
Excuse the typos, above. I meant “32GB of”, not “32GB or”
Without any particular bias/dealer preference, though I have found OWC fairly helpful, here’s that 32GB memory upgrade link that I found, there may be other tested modules/sources out there:- http://eshop.macsales.com/item/Other%20World%20Computing/1333DDR3S32S/
Hi Gerry,
Thank you for sharing this update on your iMac. However, I think you have forgotten something: Enabling TRIM support for the SSD. As you know the TRIM command is an important disk command for SSDs that keeps your flash memory appropriately cycled so that you can achieve faster read and write speeds, as well as a longer lifespan for your SSD.
Hi Anton,
You are absolutely right, I added the “Trim Enabler” application after I finished the article/video, I should have updated the article because this is important to maintain the SSD drives life, I will update the article with the relevant information, thank you for the reminder.
Gerry
Hi Gerry..
Thanks for your reply. I am a video editor and am new to Apple. I ‘ve been struggling doing this on PC and been recommended to by one, so I just bout one on Monday. Is 2012 slim model, 27″ 2.9GHz, 12GB Ram. When I read and watch videos on YouTube, people do recommend i7 3.4GHz and 32BG Ram and SSD or what u call it am not really familiar with this. Now I want to ask, will that be possible to do all that myself or to at a technician if I could bit that processor, RAMS and the SSD. because I was at Apple here and they said you cannot do that. But I think they just want people to buy new ones. Cause even the brand new latest iMac is not up to that specs. What can you advice me to do please, is that possible can it be done that way i want to do?
Thanks in Advance.
Cecil
HI Cecil,
You should be able to update the SSD and RAM yourself without a problem, I have never taken one of the slim MACS apart so I don’t know a 100% for sure. As for the CPU thats a different ballgame, I am pretty sure that the CPU change would require a motherboard change too as they tend to be different chips and chipsets, but as I say on that point I am not 100% sure. While CPU is important for rendering time, RAM is the key, the more RAM the better for video editing period. Obviously disk space is important but I would probably not do video editing on an SSD for the video data, probably OK, just feels like the wrong thing to do because of the way SSD’s work internally. If video render time is not critically important (i.e. you can let it render while you go out/go to bed etc) then I would probably have an SSD for the OS and use an external thunderbolt HDD maybe 2/2Tb for the actual video library and rendering etc…
Hope thats of some help.
Gerry
Thanks Gerry for that, I appreciate it a lot.. Lastly is forgot to ask about the graphics card, is it not changeble? And the full specs of this Mac is: i5 quad-core processor, 12GB Ram 1600mhz, 1TB thunderbolt hardrive, Nvidia 515MB (not sure the full writing). So you you think this is any good for video editing?
Hi Cecil,
The video cards are changeable *BUT* they are not easy to come by like PC ones are, they are made specifically for these computers so carry the price tag to match. I would upgrade the RAM to 32Gb and use it as is, if I were you, the machine is more than good enough but memory will be an issue if you don’t upgrade it. I use FinalCut Pro X and its a great piece of software for what I need, the MAC software stack is great for video editing, real-time scrubbing is responsive and background tasks and rendering is well thought out and well implemented.
Gerry
Hi Gerry..
Thanks you very much. I really appreciate that. I ‘ve learned that in the world there are people who spend their time and money learn and experiment things, the share with other for free and that is what you are.
If 80% of our population was like that, we would had a better work.
Thanks for your time to give me what you know I appreciate.
God bless you man.
Cecil
Hi Cecil,
You are most welcome, good luck with it, I hope you achieve what you want with it. Take care
Gerry
Hey Gerry
Im planning to do the same upgrade to my iMac mid-2010 . The only transistor i can find on webshops here in Denmark har this one
http://elektronik-lavpris.dk/files/sup12/2N2907A.PDF / http://elektronik-lavpris.dk/p97902/2N2907A_SI-P_60V_0.6A_0.4W_TO18/
Is that suitable for the temp sensor fix? And is it still the third leg to cut off?
Hope you will get back to me
Cheers
Mark
Yes, that will do, basically any silicon transistor will work just fine. Polarity is important.
Gerry
Thansk for getting back to me. Well then i must get going then 😛 Thanks for that great video 😀
Hello gerry, thanks for sharing all your knowlegde, your solution for the main HD temperature sensor seem great!
My luck ran out yesterday, my HD cant be repaired, still responses but cannot be used for installing the OS unfortunately. Its a 27inch mid (or late) 2011 iMac outside of warranty and whant to replace the harddisk myselve plus I’m planning on adding a extra ssd (same as you did) while I’m ad it.
Sorry for bothering you with that info, I have a few question about the TO-92 2N2907?
You state it doesn’t matter which silicon transistor to get, but could you please be a bit more specific about the specs of the transisitor you used and which spec are important and wich not?
Like the polarity? must I use PNP or does NPN also works? Other values like Pc, Ucb, Uce, Ueb, NPN or PNP, Ic max, frequency. Wich are important and around what outputs must the transistor give to the iMac’s motherboard for it to deceive is succesfully.
Exuse me for the amount of data asked but I really want to avoid opening the iMac more than once.
Thanks you very much for the good toturial so far and for sharing all the knowlegde.
Best regard Nico, looking foward to read your response.
Hi Nico,
You can use any silicone junction, diode or transistor, the TO92 package is convenient so any TO-92 device will do. What you are doing is using it like a diode, so you are using the base and emitter pins. The polarity depends on the device so I cannot be specific about which way around it goes onto the motherboard, what I done is measured witha multi-meter the temperature sensor on the optical drive because that had the same type of plug going to the motherboard, I cant remember the polarity now but basically work out what the optical drive one is (i.e. which lead is A and K) and then plug the transistor into the old HDD temp lead and make sure you get the same reading, (i.e. 0.6v approx in one direction, and open circuit in the other, using a DMM on diode test range). Hope that helps
Gerry
nice share gary, unpredictable imac can upgrade until that? 😀 your video too long, but very helped if someone very interest.
Hi, thanks for the feedback, yes I tend to make long video’s which is not to everyones taste I know – but thanks for watching. Gerry
Hi there,
Old post i understand but was hoping you might be linked to it still 🙂
You note using a 2N2907 on the temp sensor end, in replacement of the sensor cable not linking to a seagate (smart) drive.
Did you wire it to just the emitter / collector on the 2N2907 ? as the sensor cable is 2wire.
Thanks!
Hi Adam,
No problem, it needs to be a diode junction so it should be wired base / emitter which is in effect a silicone diode in that mode. Either cut off the collector lead or wire base/collector together, either will work.
Gerry
Gerry,
Your a star thanks mate.
does it make a diff to the polarity of which wire is which side?
Or is it directional as such
Ad
Adam,
Yes polarity matters, it will work one way but not the other. It works by detecting the voltage drop across the junction which is about 0.6v but that changes with temperature which is why it works. The diode junction needs to be forward biased so you want the +ve on the emitter and -ve on the base for the 2N2907 transistor.
Gerry
Gerry,
Many thanks makes sense! Owe you a pint for that your a star.
Ad
Your welcome, good luck with the upgrade
Gerry
Hi Gerry, gathering the components for replicating what you’ve done onto an iMac Mid-2011 21″. However i’m no electrical engineer so feel a bit stumped that i cant find the Diode you refer to (2N2907) on the Maplin’s website. There are plenty of other TO92s but i’m unsure which one is required, can you recommend which one would be a suitable alternative?
thanks.
Hi Cliff,
Any silicone transistor will do, I found this link 2N3904 which will work just fine too.
Gerry
Many thanks Gerry.
Much cheaper than the flash OWC alternative here.
Made the modifications today, everything went perfectly, except one “noisy” thing. Unfortunately there was no sensor to place the diode on for the apple HDD, as it seems the smaller 21.5″ 2011 iMac talks to certified HDDs to get their temp checks. as the HDD i’ve upgraded to apparently isn’t certified, it looks like i’ll have to go down the software fan control route, unless i can find a firmware hack for a WD Green 2tb. but aside from that, everything is great. my profile and apps are all on a SSD, i’ve the 2tb hdd to store media/save files to. and as i’ve already upped the RAM to an official 16GB. my 2 year old (almost daily used) iMac is better than ever and somewhat future proofed.
many thanks for your guidance Gerry, without it i’d never have made the modifications.
Hi Cliff,
Glad you done the upgrade. I may well have a hardware hack for the newer iMacs to use uncertified drives. Use the software fan control for now and watch this space 🙂
Gerry
FYI,
Have just upgraded OSX to Yosemite and Trim Enabler doesn’t work due to not being able to replicate Apple’s AHCI SATA drivers.
Users will have to “disable the kext signing security setting” to have TRIM working.
http://www.cindori.org/trim-enabler-and-yosemite/
Hi Cliff, thanks for [posting, there is an updated version of Trim which I just downloaded and it worked ok. Gerry
Hi Gerry – I think it’s extraordinary that you gave of your time and expertise in putting this out – thank you!
I have the same computer, and was about to do the same upgrade until I saw this dual drive from Western Digital:
http://store.westerndigital.com/store/wdeu/en_GB/DisplayAccesoryProductDetailsPage/ThemeID.22586100/productID.294185800/categoryId.31887100
I’m guessing that would now be your preferred choice for upgrading an imac 27 from 2011?
Hi David,
That looks interesting for sure, I would only worry about reliability, if the mechanical part failed you have to replace the whole thing which would be aggravation, having them separate has a lot of advantages in that regard. I was very happy to put the time in, its helped a lot of others do similar upgrades which makes me feel useful lol.
Thanks for watching and thank you for the comment.
Gerry
Hi Gerry, Thanks for all the hard work for putting together a thorough and easy to follow set of instructions. I am very impressed with the mod. I installed a 4tb Seagate and a 250gig Samsung SSD. The Seagate has a female connector for temp sensor, so I plugged it in. It turns out the IMac fans did not go into overdrive. Maybe I got lucky. I did install the SMCFanControl so that I could set a minimum fan speed and keep everything extra cool. The biggest change was removing 5 years of internal dustbunnies. The mac is much happier, cooler and quieter.
I am now looking into putting symbolic links for the user library files which are sitting on the seagate and moving them to the SSD. What do you think? It would theoretically add boot speed for some of the applications.
Cheers,
Andy in San Diego
Hi Andy,
Your welcome, I am glad you found the video useful, thank you for the feedback. Yes I would agree that anything you can put onto the SSD that is read during boot time or by the OS as its running will help things a lot, I would avoid anything that has a large number of continuous writes on the SSD, they do wear out 🙁
Gerry
The video, write-up, & comments here are very informative! I will be installing a 1TB Samsung EVO in place of my stock 1TB HDD in my Late 2009 iMac this weekend. I do have a couple of queries however. I will be cloning my drive onto the SSD. I’ve got an external SATA to USB2.0 adapter, and about 700GB to move over to the SSD, i worry about the time in doing so over my older iMacs USB2.0. Would it be feasible to open her up, unplug my ODD and plug my SSD into it’s cabling temporarily just for the clone, making it much much faster over the SATA? Also, the temp sensor hack/fix, digging through my drawers of leftover components, the closest I found was a 2N5089, will this work? Thanks in advance, and thanks again for the awesome write-up.
Yes it should be possible to hack the drive in there to do the clone, its just awkward with the screen panel, I would clone the drive the night before and use USB, mine took about 9 hours from memory so not too bad really. Yes, any silicone junction will work, just make sure you check the polarity. Thanks for the feedback and for watching. Gerry
Awesome, thanks for the reply. Yea, the thought was crack it open just enough to make the connection and just kind of leave it half apart during the clone, but re-watching the video the connection for the ODD look pretty tight and short in there, so I may just use the USB. Thanks from Texas!
Hi Johnny-Don, your most welcome, good luck with the mod. Gerry
Hi Gerry,
This has all been very helpful, thank you. I have hit a bit of a snag and not being too familiar with terminal or its commands, you’ll have to excuse my naivety. When it comes to recovering applications, I’m entering the line of code and am getting the following:
Matthews-iMac:~ admin$ ditto -v /Volumes/Macintosh HD/Library /Library
Copying /Volumes/Macintosh
ditto: can’t get real path for source ‘/Volumes/Macintosh’
Copying HD/Library
ditto: can’t get real path for source ‘HD/Library’
If there is any assistance you could provide, it would be appreciated.
Thanks,
Matt
Hi Matt,
You need to escape your spaces, type the command like this: –
ditto -v /Volumes/Macintosh\ HD/Library /Library
I have put a backslash in front of the space between Macintosh and HD.
Good luck,
Gerry
Thanks Gerry,
Is there any way to enter all four of the lines of code that you show in your description simultaneously or do they have to be done one by one?
Matt,
Sure you can concatenate commands with | or &&
have a look here: http://unix.stackexchange.com/questions/47750/combining-multiple-commands-into-a-single-line
Gerry
Hi Gerry,
After trying this, every library item is coming back with a permission denied.
Any thoughts on what I’ve done wrong?
Matt,
You should probably use “sudo” so: –
sudo …. your command
Gerry
Hi Gerry,
One last question here.
is the “Developer” portion of you copying specific to your configuration? I’m trying that line and am getting the following:
ditto: can’t get real path for source ‘/Volumes/Macintosh HD/Developer’
Promise this is the last one.
thanks
Hi Matt,
Yes it may well be, you only have that folder if you install the developer toolkits
Gerry
Hi Gerry!
Thanks for a very interesting and detailed video. I came across it while searching for instructions on how to upgrade the hard drive on a mid-2010, 27″ iMac, and it looks as if yours matches the bill perfectly!
Do you remember the make and model of the old hard drive? Mine is a 1TB Seagate Barracuda ST31000528AS. I haven’t started on the upgrade yet, but I have all the tools and a new drive (a 4TB Seagate hybrid SSHD). The thing holding me back is the business with the temperature sensor. From what I’ve read, it’s very important to install one for the new drive, as otherwise the cooling fans will spin up to max speed for lack of proper temperature information.
So the question I have is, how did you decide on the transistor to use for the replacement sensor? Was it just the first PNP transistor you happened to lay hands on, or did you select it for some specific properties, such as casing, shape, temperature characteristics or similar? I have the data sheet for it here: http://www.datasheetarchive.com/dl/Datasheet-024/DSA00422423.pdf but almost certainly I have dozens of similar transistors lying around the house which might do the job.
Follow-up question, of course, is: are you satisfied with the result, or have the fans been spinning up following the upgrade?
Anyway, thanks again for a great channel, and I hope you can find time to answer my questions so that I’ll dare to give it a go myself.
Cheers,
Peter
Hi Peter,
The model of the drive I removed was a Barracuda 7200 ST31000528AS, exactly the same as yours. The transistor can be any silicon junction device, I just happened to pick the one I used because it was in my junk components drawer. I specifically went for a TO-92 package because it was plastic and looked like the sort of size I could jam between the bracket and the drive. Ideally the temp sensor should be close to the drive spindle but within a few of degrees its fine.
In terms of the results, its been trouble free and the fans spin up and down with temperature just like it did from new so the mod worked perfectly and I am very happy with the results.
Thanks for watching and for the feedback, good luck with the upgrade.
Gerry
Thank you so much for answering, Gerry, now I feel perfectly confident that I can do this without any unexpected issues.
Peter,
You are welcome, good luck with the upgrade.
Gerry
Hello Gerry
I searched a long time on the internet for help (in text or video) with the project you already finished in 2013! Maybe I used the wrong keywords but at last found it, and thank you very very much for sharing this. Unfortunately English is not my “native tongue” so I certainly have missed some clues. One is that I’m wondering why you didn’t use the Timemachine backup to “reconstruct” all your data in the new hd. Now I need to use Terminal and type those funny commands which is a horrible task for me because I don’t know exactly what I am doing and therefor not sure about the machine’s output (if ever!). The second question is that I’m wondering if you already have upgraded to Yosemite and if you encountered problems with the ssd because of TRIM not being supported by Apple. As last question: are you still happy with the upgrade with the ssd?
Thanks in advance and hope that you will take some time for a reaction, although this project is already history for a long time for you.
Hans
Hi Hans,
Time machine would not have been smart enough to move the profiles to a different drive, I wanted my profile on the HDD but the OS and applications on the SSD, thats why I had to perform the data moves manually. Yes I updated the Yosemite when it came out, the Trim enabler did not work so was not enabled, but the guy that writes the utility had an updated version, just downloaded and installed that and re-enabled it – its been perfect.
Am I still happy with it? Yes very much so, its been flawless…
Thank you for your comments…
Gerry
Hello Gerry,
Thank you for sharing. I need to ask you something since you are an expert at this. I bought late 2013 imac which is 21.5 inch and i bought it with 256 gb ssd installed only. So this uses the pcie slot. So there should be a free sata connector inside which i can plug an internal 2.5 inch harddisk or SSD. i planning to do that but i wonder if the sata and power cords are already plugged inside since i bought it with SSD option only. Because as far as i know if the power and sata cords arent plugged in i will have to tear down the imac further more..
Any help for me ?
Cheers.
Hi Ali,
To be honest I doubt that the cables are already there, you will need to get the right cables or make something up to do the job. I also would not rely on there being a spare SATA connector, I thought that would be the case in my iMac and it turned out not to be.
Gerry
Thank you very much for the reply. Then i would not take the risk of opening the imac and burning my guarantee for hard disk installation. And i would rather continue with an external usb 3 disk of 2 TB
Cheers.
Ali
Hi Ali,
You are welcome, I don’t know for sure of course but thats been my limited experience, you can’t assume the connector is there
Gerry
oh btw my ssd is flash disk so it doesnt use a sata connector. so do you doubt that there wouldnt be even one sata connector. because from my previous e mail you might have the impression that i use a 2.5 inch ssd.
Hello Gerry
Lots of thanks for your time and answering my questions. A few days ago I began to “dismantle” my Imac, just to get some feeling in my fingers what lies beneath that shiny aluminum surface and get some knowledge what to expect cable-wise and as a matter of fact I didn’t find very big hurdles which can’t be taken. I succeeded to connect everything in the right places so everything is working fine so far. What irritates me very much is Apple’s policy to hinder this upgrade to the utmost. First we have the issue concerning the thermo sensor of the hard disk (the Internet is flooded with reports and complaints about this) and than there is this “kext signing” issue which hinders the TRIM commands. I already have submitted my concerns to Apple support, but in some discussiongroups it is stated that you don’t need TRIM at al because the “garbage handling” of the SSD will take care of the things what TRIM also does. You use the TRIM Enabler but doesn’t that mean a greater danger for attacks?
Thanks for your time and patience
Hans
Hi Hans,
My understanding is the Trim enabler simply enables a function on the drive that tells the OS its dealing with an SSD. The OS then does not try to create the swap partition on the SSD which is the main thing what would bring the drive to a swifter end of life. I suspect that having TRIM enabled does no harm so its prudent to have it than not. Its been trouble-free for me so far.
Gerry
Hello again, Gerry
It’s been some time ago since I sat behind my computer, because an uninvited “guest” -named flu- kept me very busy…
Well, more or less up and running again, started to upgrade my iMac with the ssd. It was a not so difficult as I expected it would be, and after 4 hours I could close the front glass plate, took a deep breath and started the iMac. No sound! Sweat tickled in my neck and than came that chime! I logged in and (almost) immediately after I pushed the ENTER knob the desktop appeared suddenly. It’s a breeze which makes me very happy. Never expected this speed was hidden in this old guy. Now I have to copy my Library and Application files to the SSD, but don’t understand the Terminal commands you used.
ditto -v /Volumes/Macintosh HD/Library /Library (this one I can understand, but I think there must be a space between Macintosh and HD: ……/Macintosh\ HD/)
ditto -v /Volumes.Macintosh HD/Applications /Applications (this one I don’t understand: why is there a point between /Volumes and Macintosh HD?
ditto -v /Volumes.Macintosh HD/Developer /Developer (I can’t find the Developer folder, is it hidden?
As always: thanks for your time and sharing
Hans
Hi Hans,
Thanks for the feedback, glad you got the upgrade done.
Gerry
Hi Gerry,
At the beginning I want to thank You, for your time and willingness to share knowledge.
instead of typing commands, can I use such a method: (Disc Utility) http://forum.crucial.com/t5/Crucial-SSDs/How-to-clone-your-old-hard-drive-to-your-SSD-Mac/ta-p/112072.
My iMac is late 2009 21.5″, what do you think, can I use any disk, or should I choose exactly the same brand. if I have the same cable as the CD drive is connected, can I use it instead of the transistor in the old HDD cable?
I ask about it all, because:
OWC also discovered that the “Late 2009” — and subsequently introduced “Mid-2010” — models use a “connector that seems to use the drive’s internal sensors” rather than an external sensor like earlier 20-Inch and 24-Inch Aluminum iMac models.
This means that the most straightforward way to upgrade the hard drive is to “replace the drive with another model from the same manufacturer that [OWC or another third-party has] confirmed works properly with this thermal sensor cable”. OWC provides a list of compatible drives. Readers have shared reports that taping an external temperature sensor to a hard drive or SSD that does not have an internal sensor will work in these models, but this method could be risky when data is important.
Please forgive my mistakes, I try to, but I do not speak fluent English
best regards
Peter
Hi Peter,
Thanks for your comments. Yes the later models use a built in temp sensor and the power cable has a serial out on it which the drive uses to send temperature info to the motherboard (You have got to love apple) 🙂
Regards,
Gerry
Hi Gerry
Ok then, Can I use sensor from CD ROM or Your’s method, to hack HDD system. (maybe the HDD wire from iMac 24″ with temperature sensor). Can I use different HDD (Seagate is my present HDD) or rather not?
My iMac is late 2009, not like Yours 2010.. 😉
Regards
Peter
Hi Peter,
To be honest I don’t know, from what I have read I don’t think you can. I have not come across one myself, when I do I will have a hack around with it to see what I can learn, should be able to create a small micro with a temp sensor and send the motherboard what it needs, but to do that I will need to get a working one and reverse engineer the serial data to see whats what.
Gerry
Hi Gerry
Great bunch of info on here. I started watching this video just to see how easy it would be to only swap out the main HDD for friends of mine as they bought they are running out of space on their drive as well. Thanks for the detailed explanation – for me swapping out the drive is the least intrusive as I’m not an electronic engineer..!
Just a small tip which might have saved you time. If you used the Migration Assistant you would have been able to only select the user data for transferring and it would have set the permissions for you at the same time. For info please see https://support.apple.com/en-us/HT204350
Keep up the good work!
Joyce
HI Gerry,
I’ve recently watched this excellent video (which you posted a couple of years ago now). I have a late 2009 iMac with a failing HDD, so I’m going to give your upgrade method a shot.
If I could trouble you with just one question, I’d be very grateful for your time in providing a brief answer. Incidentally, I’ve searched other forums and watched many other videos (as well as watching your own several times!) but can’t find what I’m looking for. If I’ve missed the obvious, I apologise
My question is simply this … Why did you need to install a new SATA data cable and a power splitter for the SSD? Or to put it another way, why couldn’t you have made use of the existing SATA power/data cables that fed the DVD reader/writer and the existing 1TB hard drive, and simply re-used them for the 2TB hard drive and the SSD? (I know that you originally intended to keep the DVD drive, but then decided against that due the absence of a third SATA connector on the motherboard).
Kind regards, and thanks again for taking the trouble to both produce and release your video.
Bill.
Hi Bill,
It was simply that, I was going to keep the DVD drive so needed to spit the power, I knew the HDD would have that type of power connector. Also from what I remember the DVD drive has a different power connector. Good luck with the upgrade.
Gerry
Hi Gerry,
Many thanks for such a prompt response; much appreciated.
I hadn’t realised that the connections on the DVD drive differed to those on the SSD; I’d just assumed that both used standard SATA data/power.
Thanks again.
Bill.
Hi Gerry,
One more question if I may?
In your video you state that you’ve connected the SSD to the primary SATA port and the HDD to the secondary SATA port (which used to feed the DVD). This makes sense to me, if not at least from a purely intuitive point of view. (I assume, possibly iincorrectly, that the primary SATA port is given some sort of priority when it comes to data throughput/bandwidth). However, in step 7 of your summary notes, you mention using the optical drive SATA port for the SSD. (Your machine and mine don’t have a third SATA port, but we know that the later models do). Which port did you actually use for the SSD, and in your opinion does it matter?
Thanks again,
Bill.
Bill,
In reality I don’t think it matters, both ports will have equal priority I have no doubt, I just put the SSD on the port that the original HDD was on simply by intuition as you suggested – there was nothing scientific about the choice.
Gerry
Gerry,
Again, thank you for your prompt reply and for your invaluable help. Fantastic 🙂
Bill.
Your welcome, good luck with the mod. Gerry
Hi
Getting my iMac late 2009 upgraded at last.
1tb HD replaced with WD 4tb HD (Blue), dvd drive replaced with SSD 250gb drive,
And memory from 8gb to 16gb.
So my question, does this set up sound ok. Or should I just replace 1tb HD with a single SSD 1tb.
Or can you think of a better way.
Also is there much different between the WD HD Black and Blue? I will get which ever
Is better.
Hope you can help and many thanks
Hi Tom,
The setup sounds fine, not sure you can but if your model allows you to go to 32Gb I would do that, the more memory the better always. As far as I know, the WD Black is faster BUT will generate more heat. SSD’s are getting very good now and are mainstream, you could probably just put an SSD in there instead to be honest, it depends on the type of stuff you do with the computer – if its just for general use an SSD would be a very good way to go.
Gerry
Hi Gerry.
For you, this operation is old hat and a lot of water has passed under the bridge since then; but for me it has been a new challenge, something for my 81 year old brain and fingers to get around!
I have only done half the exercise viz. installed a 250GB SSD which I achieved successfully. However, although I am able to boot from the SSD and have copied my applications to the new drive using Carbon Copy Cloner, I am struggling to reconfigure the system to use the SSD for booting and application launch and the existing 1TB HDD purely for data storage.
Please can you help?
Hi Roy,
I am not sure I understand the problem you are having, from what you are saying it could be many things. The video should give you guidance but if you have run into problems things can get very complicated very quickly. I would suggest you start by re-establishing a working system on your SSD only. When you are happy its working, then go about adding the second drive back and moving stuff around as you need.
Gerry
Great video tutorial. For for making these types of videos.
I was wondering what SSD drive would you use if you were to do this today?
Thanks!
David
Hi
All SSD’s are good, I would aim for the largest capacity from a reputable manufacturer your budget allows.
Gerry
Hi Gerry,
I have a 27″ iMac mid 2011 and I was wondering if I can use a Laptop HHD instead of a desktop drive? The reason for this is because I found a 3.5 drive to two 2.5 drive adapter and was planning to install an 256 SSD plus a 1 TB Laptop HDD in the adapter and mount the two in the iMac drive bay. I am getting a new power/data cord for the SSD so I will not need to split it. Any reason this might be a bad idea?
Thanks,
Miro
Hi Miro,
No reason why not, the 2.5″ drives will also work. However they do tend to be a little slower than their 3.5″ counterparts. To be honest with you, if you are going to the trouble of changing drives I would not put anything other than an SSD in, they have really got to the point where they are reliable and cost effective, they are 2.5″ form factor, much lower power and silent with no moving parts – and they are relatively inexpensive now too.
Gerry
I am planing to upgrade my hard drive on my iMac 27″ ( mid 2010 ) , iMac 11,3, processor : 3.2 GHz Intel Core i3 . I cannot make up my mind about what is a better SSD hard drive for my iMac. I read reviews and it’s confusing, did anyone recently replace his hard drive on a similar iMac? what is the best SSD hard drive for my iMac model between WOC and Samsung. I asked WOC they said I need to get the OWC Mercury Electra 3G, but I see in Samsung SSD hard drives Specs saying 6G but compatible with 3G.
I read reviews that I should trust WOC but I also saw some youtube videos about replacing hard drive with Samsung 850 EVO SSD.
Can someone technically help me make a decision regarding the best performance SSD HD for my iMac?
Also what is the problems that I might have with the fan ? that is a concern fo me
Thanks
Hi Gerry,
Thank you for the tutorial.
Her I am, 6 years later, when I finally decide to upgrade my iMac.
I’m feeling lucky today, so I’m gonna try to get an answer from you, even when the last question is from 2016 and it’s still without answer.
Q.: I have replaced yesterday the startup disk of my iMac 27″ mid 2010, High Sierra, for a 1Tb 6G Mercury Extreme SSD. Additionally I replaced the original HDD with another SDD 3G w/ 500Tb. I just taped the sensor on top of the SDD case hopping that the Mac will ignore it and wouldn’t trigger the fan at all. But ignorant me, the thing wasn’t that simple. The fan keeps running at the highest speed. Very noisy!
Will the Mac stop the fan if I disconnect the sensor from the logic board and just put it away completely?
If yes, will the absence of the HDD fan affect the cooling of other parts of the iMac? Is it needed it for other reasons?
Thank you very much for your help!
Joe
No, you will need to give it a sensor, otherwise, it will assume thereis an error and default to safe mode (run fan at full speed).
Gerry